Chicken Pot Pie Casserole: Creamy and Hearty
- Time:15 minutes active + 30 minutes cooking = Total 45 minutes
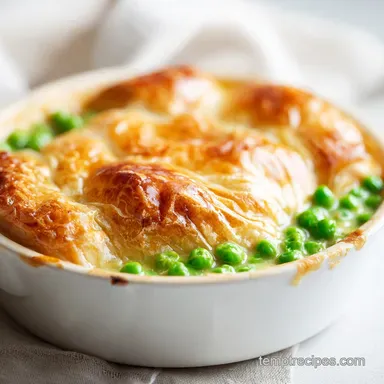
- Flavor/Texture Hook: Hearty, creamy filling topped with a mahogany colored, garlic buttered crust
- Perfect for: Stress free weeknight dinners that feel like a Sunday feast
- Hearty Chicken Pot Pie Casserole
- The Trick Behind the Texture
- Component Analysis
- The Pantry List
- Step by Step Flow
- Fixing Common Filling Fails
- Troubleshooting Common Issues
- Swaps and Flavor Twists
- Adjusting the Batch Size
- Debunking Kitchen Myths
- Storage and Zero Waste
- Making it Look Great
- Recipe FAQs
- 📝 Recipe Card
Have you ever wondered why some pot pies feel like a soggy mess while others have that distinct, buttery crunch that actually holds up? I remember one rainy Tuesday when I tried to make a traditional pie with a homemade bottom crust. It was a disaster.
The bottom was basically raw dough, and the filling had leaked everywhere. I spent an hour scrubbing my pan and feeling defeated.
That's when I realized that for a weeknight, the "casserole" style is the only way to go. Instead of fighting with a rolling pin and a flaky bottom that never cooks through, I shifted all the focus to the topping. I wanted that specific, shattering texture on top and a filling that felt like a warm hug.
This Chicken Pot Pie Casserole is the result of those trial and error nights. It's hearty, satisfying, and honestly, way less stressful than the traditional version. We're skipping the pie dish entirely and using a baking pan, which means more surface area for those garlic buttered biscuits to get golden.
Let's get into it.
Hearty Chicken Pot Pie Casserole
Right then, let's talk about why this version works where others fail. Most people just dump everything into a dish and hope for the best, but the secret is in the stovetop prep. By starting with a proper sauté and a toasted flour base, we're ensuring the sauce is stable.
I've found that using bone broth instead of regular stock adds a subtle richness that makes the filling taste like it simmered for hours, even though we're doing this in under an hour. The beauty of this recipe is that it's forgiving.
If you're missing a vegetable or want to add a bit more cream, it still comes together beautifully.
Trust me on this, the garlic butter brush on the biscuits is non negotiable. It transforms the topping from "standard store-bought" to something that tastes like it came from a bakery. It's the kind of meal that makes the whole house smell like comfort and home.
The Trick Behind the Texture
When we talk about the "feel" of this dish, we're looking for a specific contrast. You want a filling that is silky and thick, not a soup, paired with a top that has a slight crunch.
- The Roux Effect
- Toasting the flour in butter for two minutes removes the raw grain taste and creates a thickening agent that won't break under heat.
- The Searing Secret
- Browning the chicken breast first creates tiny pockets of flavor that integrate into the cream sauce.
- Steam Control
- Using biscuit halves instead of a solid sheet of dough allows steam to escape, preventing the filling from becoming watery.
- Butter Barrier
- Brushing the topping with melted butter creates a seal that helps the biscuits brown without drying out.
| Method | Prep Time | Texture | Best For |
|---|---|---|---|
| Fast Casserole | 15 mins | Soft/Velvety | Weeknights |
| Classic Pie | 60 mins | Flaky/Dense | Holidays |
| Slow Cooker | 6 hours | Stew like | Meal Prep |
The real magic happens in those first ten minutes on the stove. If you rush the sauté, you miss out on the depth. I always make sure my onions are truly translucent before adding the chicken, as that sweetness balances the saltiness of the broth.
Component Analysis
Understanding why we use these specific ingredients helps you make better swaps. For instance, the ratio of flour to liquid is what keeps this from turning into chicken soup.
| Ingredient | Science Role | Pro Secret |
|---|---|---|
| Bone Broth | Flavor Base & Liquid | Use a high protein broth for a more velvety mouthfeel |
| All Purpose Flour | Thickener (Roux) | Toast until it smells slightly nutty for better flavor |
| Heavy Cream | Emulsion Stabilizer | Adds the fat needed to carry the thyme and garlic notes |
| Garlic Powder | Topping Flavor | Mix it into melted butter to prevent the powder from burning |
I've noticed that using cold heavy cream can sometimes cause the sauce to sputter, so I usually let it sit on the counter for a few minutes before whisking it in. It's a small detail, but it makes the process much smoother.
The Pantry List
Here is everything you'll need. I've listed them exactly as they go into the pan.
- 1 lb boneless, skinless chicken breast, cubed small Why this? Cubing small ensures fast, even cooking. (Substitute: Chicken thighs for more moisture)
- 3 tbsp unsalted butter Why this? The base for our roux. (Substitute: Ghee or margarine)
- 1/3 cup all purpose flour Why this? Essential for the thickness. (Substitute: GF flour blend)
- 2 cups chicken bone broth Why this? Deep, savory flavor profile. (Substitute: Low sodium chicken stock)
- 1/2 cup heavy cream Why this? Creates that signature velvet texture. (Substitute: Half and half or full fat coconut milk)
- 1 cup frozen peas Why this? Adds pop of color and sweetness. (Substitute: Edamame or frozen corn)
- 1 cup diced carrots Why this? Earthy sweetness. (Substitute: Parsnips)
- 1 cup diced yellow onion Why this? Aromatic foundation. (Substitute: Shallots)
- 2 cloves garlic, minced Why this? Pungent depth. (Substitute: 1 tsp garlic powder)
- 1 tsp dried thyme Why this? Classic herbal note for pot pies. (Substitute: Dried rosemary)
- 1/2 tsp salt Why this? Flavor enhancer. (Substitute: Sea salt)
- 1/2 tsp black pepper Why this? Subtle heat. (Substitute: White pepper)
- 12 oz refrigerated flaky biscuits Why this? Quick, reliable lift. (Substitute: Puff pastry squares)
- 2 tbsp melted butter Why this? For the golden crust. (Substitute: Melted coconut oil)
- 1/2 tsp garlic powder Why this? Enhances the topping. (Substitute: Onion powder)
- 1 tbsp fresh parsley, chopped Why this? Fresh, bright finish. (Substitute: Dried parsley)
If you're looking for a more detailed guide on how flour works in thickening sauces, King Arthur Baking has some great resources on the basics of a roux. Understanding this will make every casserole you ever make much more consistent.
Step by step Flow
Let's get cooking. This is a two stage process: first the stovetop build, then the oven finish.
1. Sauté for Depth
Melt 3 tbsp butter in a skillet over medium heat. Add your diced onions and carrots. Sauté them for about 5 minutes until the onions are translucent and fragrant. Once they've softened, stir in the minced garlic and cubed chicken.
Cook these until the chicken is seared on the outside and no longer pink.
2. Build the Velvety Base
Sprinkle the 1/3 cup of flour over the chicken and vegetables. Stir constantly for 2 minutes until the flour is toasted and coats everything. Slowly whisk in the chicken bone broth and heavy cream.
Keep the heat on low and simmer until the sauce thickens into a glossy glaze that coats the back of a spoon.
3. The Final Fold
Fold in the frozen peas and dried thyme. Remove the pan from the heat immediately. Now is the time to taste it - adjust your salt and pepper. Pour the mixture into a 9x13 inch baking dish, using a spatula to smooth the top so the biscuits have a flat surface to sit on.
4. Assemble and Brown
Cut your biscuit halves and place them over the filling. In a small bowl, mix the melted butter with the garlic powder and brush it generously over the tops. Bake at 400°F (200°C) for 15-20 minutes until the topping is mahogany colored and the filling is bubbling around the edges.
5. The Finishing Touch
Take the dish out of the oven and let it sit for 5 minutes. Garnish with the chopped fresh parsley. This resting period is key because it lets the sauce set slightly, so you don't get a "soup leak" when you scoop it out.
Chef's Note: If you have a meat thermometer, the filling should hit 165°F (74°C) before you pull it out. Since the chicken is already seared, the oven time is mostly about the biscuits and heating the sauce through.
Fixing Common Filling Fails

Even the best of us hit a snag. Usually, it's a matter of heat or timing. If your sauce isn't behaving, don't panic.
Troubleshooting Common Issues
| Issue | Solution |
|---|---|
| Why Your Filling is Too Runny | This usually happens if the flour wasn't toasted enough or if you didn't simmer the sauce long enough before adding it to the baking dish. If you notice it's too thin before baking, simmer it for anot |
| Why Your Biscuits are Raw | If the tops are brown but the bottoms are doughy, your oven might be running too hot, or the filling was too cold. Always ensure your stovetop mixture is hot when it hits the pan. |
| Why the Taste is Flat | Sometimes the "creaminess" masks the salt. If the dish tastes bland, a tiny squeeze of lemon juice or an extra pinch of salt right at the end can wake up all the other flavors. |
Common Mistakes Checklist:
- ✓ Did you toast the flour for the full 2 minutes?
- ✓ Is the oven preheated to exactly 400°F (200°C)?
- ✓ Did you brush the butter on after placing the biscuits?
- ✓ Did you let the casserole rest for 5 minutes before serving?
- ✓ Did you use a 9x13 pan to ensure the sauce doesn't overflow?
Swaps and Flavor Twists
One of the best things about a Chicken Pot Pie Casserole is how easily you can tweak it. Depending on what's in your fridge, you can change the entire vibe of the meal.
For a "Comfort Plus" Twist: Add a cup of frozen corn or some diced potatoes to the sauté step. If you use potatoes, make sure they are cut very small (about 1/2 inch) so they cook through in the same time as the carrots.
For Dietary Adjustments: If you're avoiding gluten, use a 1:1 GF flour blend and gluten-free biscuits. For a dairy-free version, swap the butter for vegan butter and the heavy cream for full fat coconut milk. You'll lose a bit of that classic buttery tang, but the richness remains.
For Different Toppings: If you're not in the mood for biscuits, try puff pastry. Just roll it out, cut it to size, and prick it with a fork. If you happen to have some sourdough discard in the fridge, you could even make sourdough discard tortillas on the side to scoop up the filling.
| Original Ingredient | Substitute | Why It Works |
|---|---|---|
| Heavy Cream (1/2 cup) | Half and Half (1/2 cup) | Similar creamy texture. Note: Slightly less rich |
| Bone Broth (2 cups) | Chicken Stock (2 cups) | Standard liquid base. Note: Less body than bone broth |
| Frozen Peas (1 cup) | Mixed Frozen Veg (1 cup) | Adds variety. Note: Changes the color profile |
If you want a completely different way to use your chicken for the week, you might enjoy my Chicken Shawarma recipe, which takes the protein in a totally different, zesty direction.
Adjusting the Batch Size
Scaling this recipe is pretty straightforward, but you have to be careful with the pan size. If you use a pan that's too large, the sauce will spread too thin and evaporate, leaving you with a dry bake.
Scaling Down (Half Batch): Use an 8x8 inch square pan. Reduce the baking time by about 20%, starting to check the biscuits at the 12 minute mark. Since you're using half the ingredients, remember to beat one egg if you're using an egg wash, then just use half of it.
Scaling Up (Double Batch): Use two 9x13 inch pans. Do not try to double the depth in one pan, or the biscuits will never cook through. For the spices, I recommend only increasing them to 1.5x first, then tasting.
Liquids usually don't need to be doubled exactly - 1.8x is often enough to prevent the filling from becoming too soupy.
Temperature Adjustments: If you're baking two pans at once on different racks, lower the temp to 375°F (190°C) and extend the time by 5-10 minutes. This ensures the bottom pan gets enough heat and the top pan doesn't burn.
Debunking Kitchen Myths
There are a few things people always say about pot pies that just aren't true. Let's clear those up.
Myth: You must use a bottom crust for "authentic" flavor. Truth: The bottom crust often stays raw or gummy in home ovens. By using a casserole style, you get more of the creamy filling and a better ratio of topping to base.
Myth: Frozen vegetables are lower quality than fresh. Truth: For this recipe, frozen peas are actually superior because they are flash frozen at peak ripeness. Fresh peas can often turn a dull olive green when baked, whereas frozen ones stay bright.
Myth: Searing the chicken "seals in the juices." Truth: Searing doesn't actually seal anything, but it creates a complex flavor through browning. The moisture is kept in by the creamy sauce that surrounds the meat during the bake.
Storage and Zero Waste
This Chicken Pot Pie Casserole is a meal prep dream, provided you store it correctly so the biscuits don't get soggy.
Fridge Storage: Store leftovers in an airtight container for up to 3 days. I recommend storing the biscuits separately from the filling if you have the space. This keeps the topping from absorbing too much moisture from the sauce.
Freezing Guide: You can freeze the filling and the biscuits separately. Freeze the filling in a freezer safe bag for up to 3 months. To freeze the whole thing, assemble it but do not bake. Wrap it tightly in foil.
When you're ready to eat, thaw it in the fridge overnight and bake as directed, adding 5-10 minutes to the timer.
Zero Waste Tips: If you have leftover chicken breast or a rotisserie chicken, use it instead of raw cubed breast! It's a great way to clear out the fridge. Also, if you have leftover vegetable scraps from the carrots and onions, toss them in a freezer bag to make your own homemade broth for the next time you make this.
Making it Look Great
We eat with our eyes first, and while this is a comfort dish, it doesn't have to look messy.
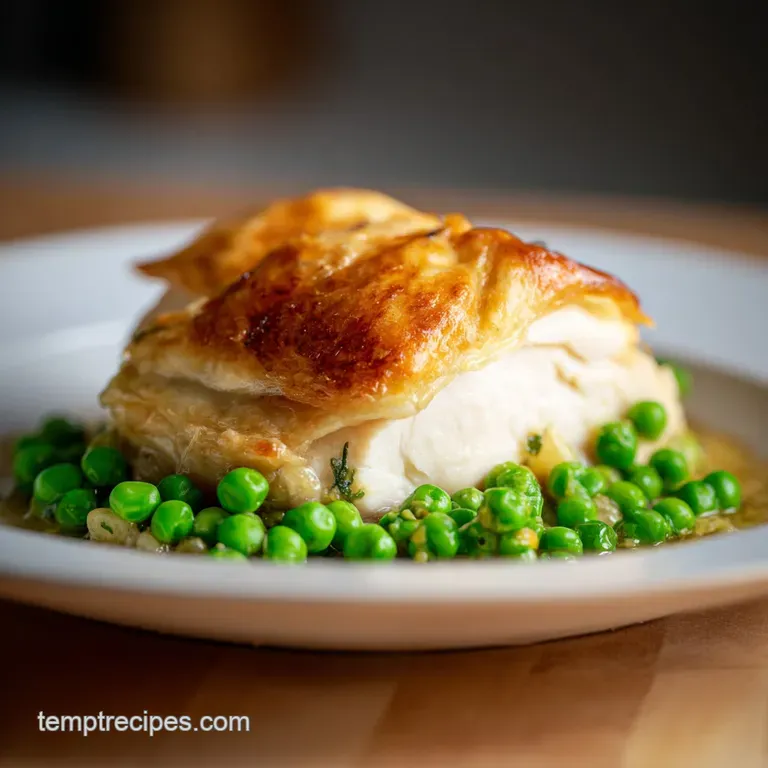
For a Restaurant Style Plating: Instead of scooping it out haphazardly, use a large slotted spoon to lift a clean portion of filling, then carefully place one whole golden biscuit on top. This gives the plate height and looks much more intentional.
The Perfect Side Pairings: Since this is a very rich, creamy dish, you need something acidic or fresh to cut through the fat. A simple arugula salad with a lemon vinaigrette or some steamed green beans with a squeeze of lime works perfectly.
The Final Garnish: Don't skip the parsley. The bright green against the mahogany biscuits and creamy white sauce is what makes the dish pop. For an extra touch, a light dusting of cracked black pepper over the top adds a professional finish.
Recipe FAQs
What are some common mistakes to avoid when making chicken pot pie?
Under toasting the flour or adding cold filling to the pan. Not cooking the flour for the full 2 minutes leads to a raw taste and runny sauce. Ensuring the filling is hot before topping with biscuits prevents doughy bottoms.
How to prevent the filling from being too runny?
Simmer the sauce on low until it becomes a glossy glaze. Ensure the flour is toasted for 2 minutes before adding chicken bone broth and heavy cream to properly thicken the base.
Why are my biscuits brown on top but raw on the bottom?
The oven is likely too hot or the filling was too cold. This prevents the heat from penetrating the biscuits before the tops burn at 400°F.
How to store leftovers so the biscuits stay crisp?
Store the biscuits and filling in separate airtight containers. This prevents the topping from absorbing moisture from the sauce while in the fridge.
Can I freeze this casserole before baking?
Yes, assemble the dish and wrap it tightly in foil. Store it in the freezer and bake when ready, or freeze the filling and biscuits separately for up to 3 months.
How to ensure the chicken is seared properly?
Sauté the cubed chicken in melted butter over medium heat. Cook until the outside is browned before sprinkling with flour to lock in the flavor.
Can I substitute the chicken for another protein?
Yes, you can use other meats. If you prefer a different protein, the savory vegetable base pairs well with others, similar to the flavor profiles in our mediterranean beef.
Chicken Pot Pie Casserole