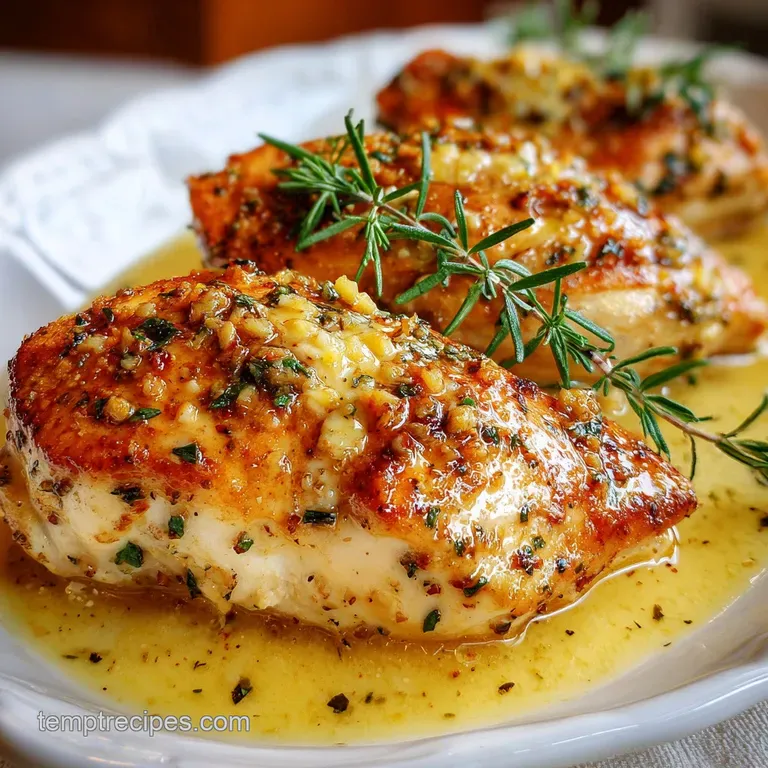
Ruths Chris Stuffed Chicken Copycat with Garlic Butter
- Time: Active 20 minutes, Passive 25 minutes, Total 45 minutes
- Flavor/Texture Hook: Molten, velvety herb cheese center with a golden brown, buttery exterior.
- Perfect for: A satisfying weekend dinner or a stress free special occasion meal.
- Mastering This Irresistible Ruths Chris Stuffed Chicken Copycat
- Achieving Steakhouse Luxury with Simple Home Tools
- Analyzing the Components for Flavor Success
- Selecting Quality Ingredients for a Velvet Filling
- Minimal Tool Kit for Maximum Culinary Impact
- Step by Step Guide to Poultry Perfection
- Troubleshooting the Most Frequent Stuffed Chicken Errors
- Modifying Your Meal for Specific Nutritional Needs
- Smart Storage and Reheating for Busy Weeknights
- Serving Your Masterpiece with Classic Steakhouse Flair
- Debunking Poultry Preparation Myths
- High in Sodium ⚠️
- Recipe FAQs
- 📝 Recipe Card
Mastering This Irresistible Ruths Chris Stuffed Chicken Copycat
The first time I tried to recreate that famous steakhouse chicken, my kitchen smelled like a dream but looked like a dairy disaster. I had stuffed the chicken breasts with room temperature cheese and cranked the heat too high.
Within five minutes, the cheese had made a frantic escape into the pan, leaving me with hollow poultry and a smoky mess. It was a classic "expectation vs. reality" moment that taught me everything I know now about the importance of temperature control and pocket precision.
Since that night, I've refined the process into something far more reliable and satisfying. Indulge in this Irresistible Ruths Chris Stuffed Chicken Copycat Recipe with Garlic Butter and elevate your dinner tonight.
This isn't about fancy gadgets or professional training, it's about understanding how to trap moisture inside a lean protein while getting that signature sizzle on the outside. We're aiming for a heartier, more comforting version of the restaurant classic that fits perfectly into a home cook's routine.
This dish is a total crowd pleaser because it feels like a heavy duty luxury meal, yet the prep is surprisingly straightforward once you know the tricks. We aren't just making dinner, we are creating a moment where the first cut of the knife releases a velvety flow of herb flecked cheese into a pool of garlic butter.
It's the kind of meal that makes everyone at the table go quiet for a second just to enjoy the aroma.
Achieving Steakhouse Luxury with Simple Home Tools
The Cold Core Strategy: Using chilled Neufchâtel cheese creates a thermal buffer that allows the chicken to reach a safe internal temperature before the filling completely liquifies. This ensures the stuffing stays inside the breast rather than leaking onto the baking sheet.
The Maillard Advantage: Searing the chicken in a hot skillet first creates a complex crust of flavor compounds through the Maillard reaction. This initial over high heat contact develops the deep, golden brown color and nutty aroma that an oven alone simply cannot replicate.
Thermal Lag Management: By resting the chicken for a few minutes after cooking, the internal juices redistribute, and the carryover heat ensures the cheese center reaches its peak molten state without overcooking the meat.
| Thickness | Internal Temp | Rest Time | Visual Cue |
|---|---|---|---|
| 1.5 inches | 165°F (74°C) | 5 minutes | Juices run clear |
| 1 inch | 165°F (74°C) | 3 minutes | Firm to the touch |
| 2 inches | 165°F (74°C) | 7 minutes | No pink near bone |
The key to that iconic restaurant finish is the interaction between the hot plate and the cold butter drizzle at the very end. When the garlic butter hits the seared surface, it creates an immediate sizzle that atomizes the garlic oils, surrounding the dish in a fragrant cloud. If you're looking for another comforting classic that saves time on a Tuesday, my 30 Minute Beef recipe is a solid go to for quick weeknight wins.
Analyzing the Components for Flavor Success
Understanding the "why" behind your ingredients makes you a more confident cook. For this recipe, every component serves a specific structural or flavor based purpose. We aren't just throwing things together, we are building layers of texture.
| Ingredient | Science Role | Pro Secret |
|---|---|---|
| Neufchâtel Cheese | High moisture, low melt point | Use chilled to prevent early leaks |
| Smoked Paprika | Adds earthy depth and color | Rub into skin for a darker sear |
| Fresh Thyme | Volatile oil aromatic | Mince finely to distribute flavor evenly |
| Sharp White Cheddar | Provides fat and "tang" | Grate from a block for better melting |
The choice of Neufchâtel over standard cream cheese is a practical one for the home cook. It has a slightly higher moisture content and a lighter texture, which makes the filling feel more like a sauce and less like a heavy block of cheese. This subtle shift transforms the dish from a simple stuffed breast into a velvety, restaurant style experience. For those who can't get enough of that savory depth, this pairs wonderfully with the flavors found in my Creamy Garlic Parmesan recipe.
Selecting Quality Ingredients for a Velvet Filling
For the herb cheese core, you will need 8 oz of Neufchâtel cheese, which should be kept chilled until the moment you are ready to mix. Combine this with 1/2 cup of finely shredded sharp white cheddar for a punch of flavor.
You'll also need 1 tsp of fresh lemon juice, 1 tbsp of minced fresh thyme, 1/2 tsp of garlic powder, and 1/2 tsp of smoked paprika to round out the interior seasoning.
The poultry base requires 4 large boneless, skinless chicken breasts, each approximately 200g. You will season the exterior with 1 tbsp of extra virgin olive oil, 1 tsp of kosher salt, and 1/2 tsp of cracked black pepper.
For the final touch, the signature garlic butter drizzle consists of 3 tbsp of unsalted butter, 3 cloves of smashed and minced garlic, and 1 tsp of chopped fresh parsley.
| Original Ingredient | Substitute | Why It Works |
|---|---|---|
| Neufchâtel Cheese | Full fat Cream Cheese | Similar texture but slightly denser |
| Sharp White Cheddar | Monterey Jack | Melts beautifully with a milder flavor |
| Fresh Thyme | Dried Thyme (1/3 amount) | Concentrated flavor, but less "bright" |
| Smoked Paprika | Sweet Paprika | Adds color without the smoky undertone |
Using fresh thyme really is a non negotiable for me here. Dried herbs are fine in a pinch, but the volatile oils in fresh thyme react with the heat of the chicken to create a floral aroma that defines the "Ruths Chris" style. It adds a layer of sophistication to a very hearty, comforting meal.
Minimal Tool Kit for Maximum Culinary Impact
You don't need a professional kitchen to pull this off. A reliable oven safe skillet, such as a cast iron pan, is your best friend here. It allows you to move the chicken from the stove to the oven without changing pans, which keeps all those flavorful browned bits (the fond) in contact with the meat.
If you don't have cast iron, any heavy bottomed skillet and a standard baking sheet will do.
A sharp chef's knife is the only other essential tool. Creating a clean "pocket" in the chicken breast without slicing all the way through requires a steady hand and a blade that doesn't tear the meat.
I also recommend a small mixing bowl for the cheese filling and a spoon or a piping bag if you want to be extra precise with the stuffing.
Chef Tip: If you don't have a piping bag, just snip the corner off a gallon sized freezer bag. It gives you much more control than a spoon and keeps the edges of the chicken clean, which helps the "seal" stay shut during the sear.
step-by-step Guide to Poultry Perfection
Phase 1: Precision Pocketing
Place each 200g chicken breast on a flat surface. Using a sharp knife, slice a horizontal pocket into the thickest part of the breast. Note: Be careful not to cut all the way through the other side or the bottom.
Phase 2: The Velvety Filling
In a small bowl, combine the 8 oz chilled Neufchâtel, 1/2 cup shredded cheddar, 1 tsp lemon juice, 1 tbsp thyme, 1/2 tsp garlic powder, and 1/2 tsp smoked paprika. Mix until combined but still firm. Divide the mixture into four equal portions and stuff it deep into each chicken pocket.
Phase 3: The Mahogany Sear & Roast
Secure the openings with toothpicks if necessary. Rub the exterior with 1 tbsp olive oil, 1 tsp salt, and 1/2 tsp pepper. Heat an oven safe skillet over medium high heat. Sear the chicken for 3 minutes per side until a deep golden crust forms.
Phase 4: The Finishing Bake
Transfer the skillet directly into a preheated oven at 200°C. Bake for 15 to 20 minutes until the internal temperature hits 165°F (74°C).
Phase 5: The Garlic Butter Sizzle
While the chicken rests, melt 3 tbsp butter in a small pan. Add 3 cloves of minced garlic and 1 tsp parsley. Sauté for 1 minute until the garlic is fragrant and barely golden. Pour this over the chicken just before serving.
Phase 6: The Rest
Let the chicken sit for 5 minutes before serving. Note: This prevents the molten cheese from rushing out the moment you cut into it.
| Cooking Method | Time | Texture | Best For |
|---|---|---|---|
| Skillet to Oven | 25 minutes | Crispy skin, juicy meat | Authentic steakhouse result |
| Air Fryer | 18 minutes | Super crispy exterior | Quick cleanup/smaller batches |
| Full Oven Roast | 35 minutes | Uniformly tender | Cooking for a large crowd |
The skillet to oven method is my personal favorite because it captures the best of both worlds: the over high heat crunch from the stove and the gentle, even cooking of the oven. It's the most reliable way to ensure the meat stays juicy while the cheese reaches that perfect molten state.
Troubleshooting the Most Frequent Stuffed Chicken Errors
The Filling Is Leaking Out
This is the most common frustration. Usually, it happens because the pocket was cut too wide or the cheese wasn't cold enough when it went into the oven. If the opening is too large, the cheese expands as it heats and follows the path of least resistance.
To fix this, ensure you leave at least a 1 inch border of uncut meat around the edges of the breast. Using toothpicks to "stitch" the opening shut is a simple, effective insurance policy.
Also, avoid overstuffing; it's tempting to pack in extra cheese, but the chicken needs to be able to close naturally around the filling.
| Problem | Root Cause | Solution |
|---|---|---|
| Dry Chicken | Overcooked in oven | Use a meat thermometer to pull at 160°F |
| Soggy Crust | Not enough initial heat | Preheat skillet for 3 mins before searing |
| Filling is Cold | Chicken too thick | Flatten the breast slightly before pocketing |
Common Mistakes Checklist
- ✓ Pat the chicken completely dry with paper towels before seasoning (moisture is the enemy of a good sear).
- ✓ Keep the Neufchâtel in the fridge until the very second you need to mix the filling.
- ✓ Don't crowd the pan; if the breasts are touching, they will steam instead of sear.
- ✓ Allow the garlic butter to foam slightly before adding the garlic to ensure the flavor infuses properly.
- ✓ Always let the meat rest; cutting too early results in a "cheese volcano" on your plate.
Modifying Your Meal for Specific Nutritional Needs
This recipe is naturally quite keto friendly because it focuses on high protein and healthy fats with very few carbohydrates. If you are following a strict low carb lifestyle, you are already mostly there. Just ensure your smoked paprika and garlic powder don't have added sugars or cornstarch fillers.
For those looking to reduce the fat content slightly, you can swap the Neufchâtel for a low-fat cream cheese, though be aware that it may melt faster and be more prone to leaking. You can also use a light brushing of oil instead of a full tablespoon.
- If you want a crunchier texture, add 2 tbsp of crushed pork rinds to the herb cheese filling.
- If you want a spicy kick, add a pinch of cayenne pepper or diced jalapeños to the stuffing.
- If you want a lighter finish, substitute half the butter in the final drizzle with a splash of dry white wine and extra lemon juice.
Smart Storage and Reheating for Busy Weeknights
Leftover stuffed chicken can be kept in an airtight container in the fridge for up to 3 days. However, reheating can be tricky because you don't want to rubberize the chicken while trying to melt the cheese core.
I recommend reheating in the oven at 175°C for about 10 to 12 minutes. Avoid the microwave if possible, as it tends to make the chicken chewy and the cheese oily.
For a zero waste approach, if you have extra cheese filling, it makes an incredible spread for crackers or a topping for baked potatoes the next day. Any leftover garlic butter can be tossed with pasta or used to sauté some quick greens like spinach or kale to serve as a side.
Chef Tip: Freeze the raw stuffed chicken! You can prep these up to a month in advance. Wrap each stuffed breast tightly in plastic wrap and then foil. Thaw completely in the fridge overnight before searing and baking as directed. It’s a total lifesaver for busy weeks.
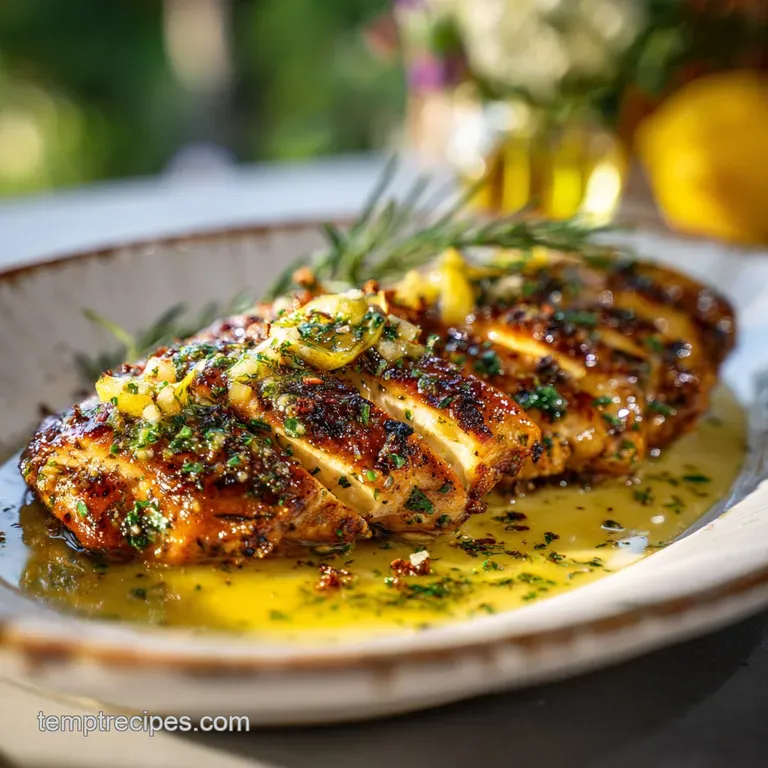
Serving Your Masterpiece with Classic Steakhouse Flair
Presentation is half the fun with a copycat recipe. To get that authentic steakhouse look, serve the chicken on a pre heated plate. This keeps the garlic butter sizzling for a few extra seconds as it hits the table.
A simple garnish of fresh parsley and a lemon wedge adds a pop of color that cuts through the richness of the cheese.
I love serving this alongside something green and crisp, like roasted asparagus or a simple arugula salad with a light vinaigrette. The acidity of the salad balances the heavy, satisfying nature of the stuffed chicken.
It's a meal that feels complete, balanced, and remarkably stress free to pull together once you've mastered the sear.
- Steakhouse Sizzle: Use a small metal pitcher to pour the hot garlic butter over the chicken right in front of your guests.
- Contrast & Color: Slice one breast on a bias (at an angle) to show off the molten center before serving.
- Herb Freshness: Save a few whole thyme sprigs to tuck under the chicken for an aromatic touch.
Debunking Poultry Preparation Myths
One common myth is that you need to "seal" the meat to lock in juices. Searing actually creates flavor through the Maillard reaction, but it doesn't create an impermeable barrier. Moisture loss still happens, which is why the resting period is the most important step for a juicy result.
Another misconception is that the cheese filling will keep the chicken moist even if you overcook it. While the fat in the cheese helps the "mouthfeel," it won't save the actual chicken fibers from becoming tough and stringy if they go past 170°F (77°C).
Trust your thermometer, not the cheese!
Finally,, many believe you need a complicated array of spices to get that "restaurant taste." In reality, most high end steakhouses rely on high-quality salt, black pepper, and butter. The magic in this recipe comes from the technique and the freshness of the thyme, not a secret 20 ingredient spice rub.
Keep it simple, focus on the sear, and you'll have a satisfying meal every single time.

High in Sodium ⚠️
875 mg mg of sodium per serving (38% % of daily value)
The American Heart Association recommends limiting sodium intake to about 2,300mg per day for overall cardiovascular health.
Sodium Reduction Tips for this Recipe
-
Reduce Cheddar-15%
The shredded cheddar contributes significantly to the sodium content. Reduce the amount of cheddar cheese by half, using only 1/4 cup, for a noticeable reduction in sodium. Consider using a low-sodium or reduced fat cheddar.
-
Skip Kosher Salt-25%
Eliminate the 1 tsp of kosher salt added to the chicken breasts. Flavor can be enhanced with other spices and herbs. This will significantly reduce the overall sodium.
-
Unsalted Everything-10%
Ensure you are using completely unsalted butter, as even 'lightly salted' butter contains sodium. Verify the Neufchâtel cheese is also unsalted, although it naturally contains some sodium.
-
Herb Power!
Experiment with a wider variety of fresh and dried herbs and spices to boost flavor without adding sodium. Consider adding onion powder or a pinch of red pepper flakes.
-
Spice It Up
Enhance the flavor profile with spices that don't contain sodium. Increase the smoked paprika or add a pinch of cayenne pepper.
Recipe FAQs
What temperature should the chicken reach before removing it from the oven?
165°F (74°C). Use a reliable meat thermometer inserted sideways into the thickest part of the breast to ensure both the meat is safe and the cheese filling has fully melted.
How can I prevent the cheese filling from leaking out during searing?
Keep the filling very cold. The cheese core must be thoroughly chilled until the moment you stuff the chicken to create a thermal buffer against the hot skillet.
How long should I sear the chicken breasts before moving them to the oven?
Sear for 3 minutes per side on medium high heat. This initial sear is crucial for developing the rich brown crust through the Maillard reaction, a principle you also utilize when mastering the crust on the Sheet Pan Lemon recipe.
Is it mandatory to use Neufchâtel cheese, or can I use regular cream cheese?
No, substitution is possible but alters texture. Regular cream cheese is slightly denser and may result in a heavier, less velvety molten center.
How do I achieve the signature intense garlic butter flavor for the topping?
Sauté the minced garlic briefly in melted butter until fragrant. Be careful not to brown the garlic too much; you want aromatic flavor, not bitterness, which is a flavor balancing act similar to what's required for the sweet and sour notes in our Hot Honey Pickled recipe.
What is the resting period required after the chicken comes out of the oven?
Rest the chicken for 5 minutes minimum. This allows the internal temperature to equalize and the cheese filling to stabilize so it doesn't immediately rush out when sliced.
Can I make this recipe ahead of time for easier weeknight cooking?
Yes, freezing the raw stuffed chicken is highly recommended. Wrap tightly in plastic and foil, then freeze; thaw completely in the refrigerator before following the standard searing and baking instructions.
Ruths Chris Stuffed Chicken Copycat

Ingredients:
Instructions:
Nutrition Facts:
| Calories | 631 kcal |
|---|---|
| Protein | 70.3 g |
| Fat | 36.3 g |
| Carbs | 2.6 g |
| Fiber | 0.4 g |
| Sugar | 1.5 g |
| Sodium | 875 mg |
